Docker for DevOps Engineers : 3

I am a Certified AWS Cloud Practitioner and heading towards becoming a Devops Engineer.
Docker Volume:
In Docker, a volume is a mechanism for persisting data generated by a container or allowing multiple containers to access the same data. A Docker volume is a named storage location that can be mounted to one or more containers.
When a container is created with a volume, Docker creates a directory on the host machine and maps it to the container's file system. This allows the container to write to and read from the directory, and any changes made to the directory by the container are persisted even if the container is removed or restarted.
Volumes can be created using the docker volume create command, or they can be created automatically when a container is created using the --mount or -v options.
Docker volumes have several advantages over bind mounts, which are another way to persist data between a container and the host machine. Volumes can be managed independently of containers, can be backed up and restored more easily, and can be shared among multiple containers.
Docker Network:
In Docker, a network is a way to connect containers so that they can communicate with each other, either on the same host or across hosts.
Docker provides several types of networks, including:
Bridge network: This is the default network that is created when Docker is installed. Containers connected to the bridge network can communicate with each other by IP address, and containers can be exposed to the host network through port forwarding.
Host network: In this mode, the container is attached directly to the host network and is accessible via the host's IP address. This is useful when the container needs to have the same network identity as the host.
Overlay network: This type of network enables communication between containers running on different hosts. It uses the VXLAN protocol to create an overlay network on top of an existing network infrastructure.
Macvlan network: This mode allows containers to have their own MAC address and appear as if they were physical hosts on the network. This can be useful for scenarios where the container needs to have its own IP address and network identity.
None network: This mode disables all networking for the container.
Docker networks can be created and managed using the docker network command. When a container is started, it can be connected to one or more networks using the --network option. By default, containers are connected to the bridge network.
Using Docker networks, containers can communicate with each other easily and securely, without exposing unnecessary ports or opening up security vulnerabilities.
Task-1
Create a multi-container docker-compose file that will bring UP and bring DOWN containers in a single shot ( Example - Create application and database container )
- First, create a docker volume named volume1.

- after creating volume create a multi-container docker-compose file as shown
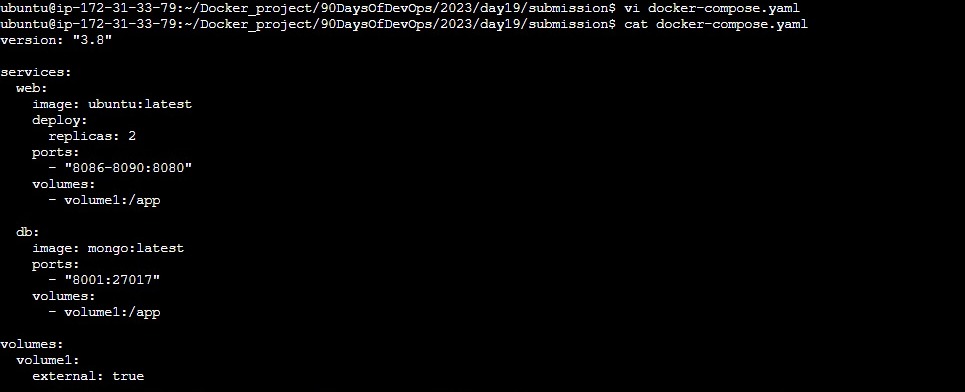
This Docker Compose file defines two services: web and db. The web service is based on the ubuntu:latest image and is configured to run two replicas. It exposes ports 8086 through 8090 on the host and maps them to port 8080 inside the container. It also mounts a volume named volume1 to the /app directory inside the container.
The db service is based on the mongo:latest image and exposes ports 27818 and 27819 on the host, which are mapped to port 27017 inside the container. It also mounts the same volume1 volume to the /app directory inside the container.
At the end of the file, we define the volume1 volume as an external volume, which means it should already exist before running the Docker Compose file.
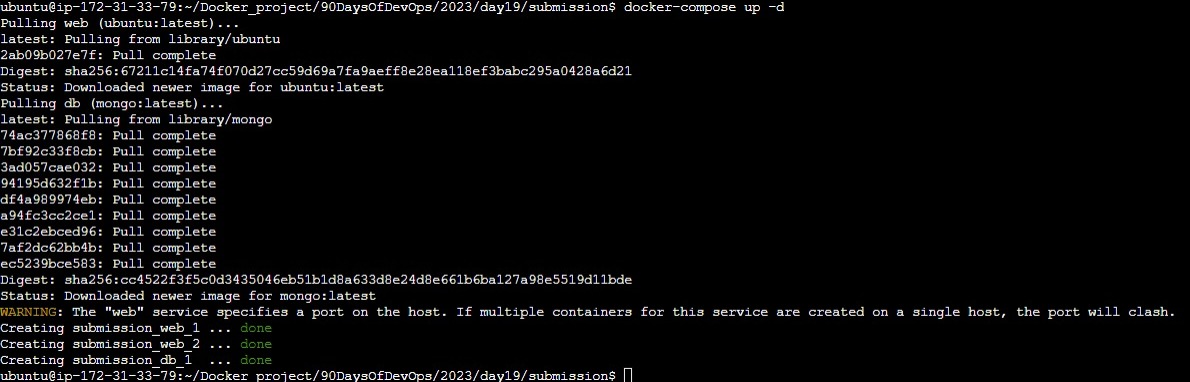
- Use the
docker-compose upcommand with the-dflag to start a multi-container application in detached mode.
- Use the
docker-compose scalecommand to increase or decrease the number of replicas for a specific service. You can also add replicas in the deployment file for auto-scaling.

- Use the
docker-compose pscommand to view the status of all containers

- Use the
docker-compose logsto view the logs of a specific service.

- Use the docker-compose down command to stop and remove all containers, networks, and volumes associated with the application

Task-2
- Learn how to use Docker Volumes and Named Volumes to share files and directories between multiple containers.
mkdir volume1
Now, we are creating a docker volume and attaching it to the volume directory in our local machine that we just created.

Create two or more containers that read and write data to the same volume using the
docker run --mountcommand.we mount the Ubuntu container to the docker volume we just created,
Repeat the same step for mounting the docker volume for the Mongo container

- Verify that the data is the same in all containers by using the
docker exec -itcommands to run commands inside each container.
Now, we mount data into the Ubuntu container by using the docker exec command

Mounting data in Ubuntu container
Now, we run the docker exec command for the Mongo container and verify that we can access the same data that we had mounted on the Ubuntu container.
Try doing it yourself by following the same procedure.
So we can conclude, both the containers (ubuntu and Mongo) sharing the same volume.
- Use the
docker volume lscommand to list all volumes anddocker volume rmcommand to remove the volume when you’re done.

Now, to remove, first we stop and remove the running containers,


Still, when we check the shared volume the data remains and is not destroyed.
Give it a try.
************************************************************************
Thanks for reading! Hope you find this helpful.
Happy learning !!!
Suggestions are always welcome.
Thank You - Shubham Londhe


